 |
 |
*************************************************************************************
* Description: Oracle Data Appliance[ODA] X6-2M machine configuration and Deployment
* Date: 11:01 PM EST, 12/10/2017
*************************************************************************************
<1> Oracle Data Appliance X6-2M:
|
|__ o. Oracle Database Appliance, known as ODA Box, is a fully integrated engineering product and solution optimized to run databases with RDBMS and GI.
| Since Oracle purchased SUN, it provides a physical engineering server, dedicately designed to support Oracle single RDBMS database, or GI HA solution based on
| Sun's hardware technology, with configured software, storage, CPU/memory compute, and networking settings.
|
|__ o. Advantages:
>> Software, compute, networking, and storage, engineered to work together seamlessly.
>> Support for Oracle Database Enterprise Edition and Standard Edition.
>> Ease of deployment, patching, management, and support.
>> Built-in automation and best practices for storage configuration and database provisioning.
>> Reliable architecture with redundant power, cooling, networking, and storage.
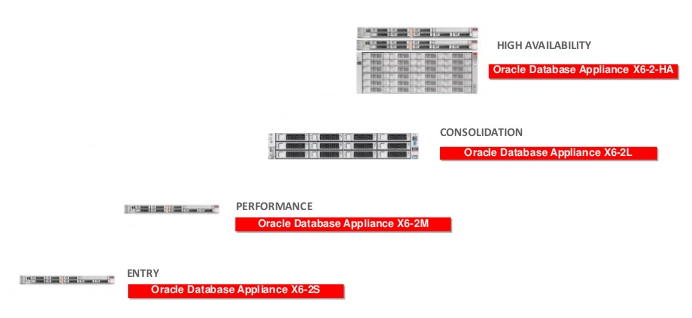
<2> ODA X6-2M, means product generation 6, middle size. The following image indicates all the models or members in this generation.
|
|__ o. The difference is on CPU cores and storage size, and only X6-2HA supports 2-nodes RAC high availability infrastructure.
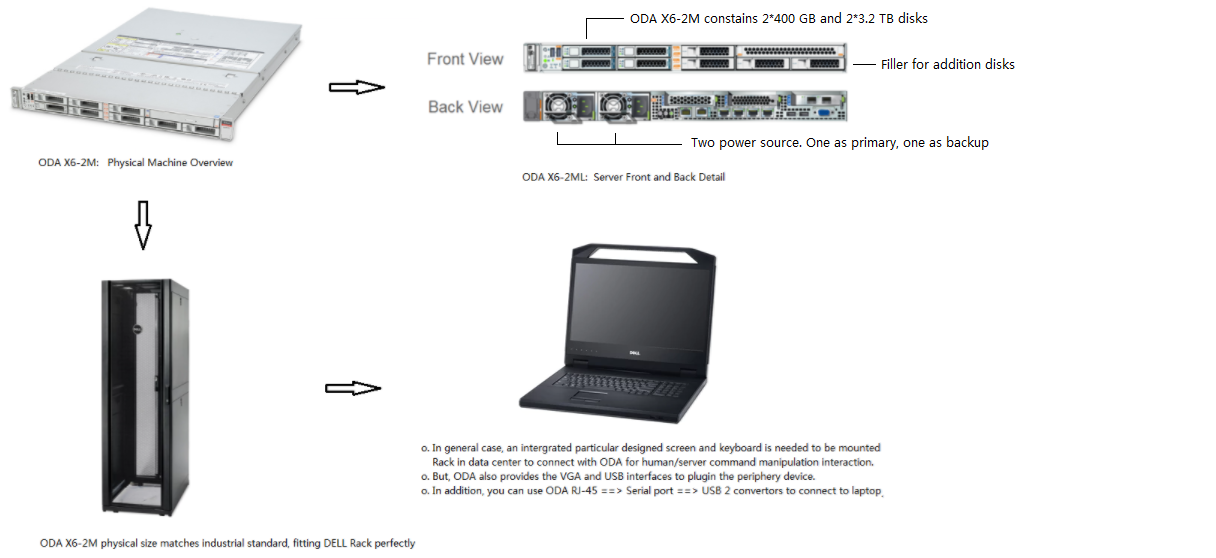
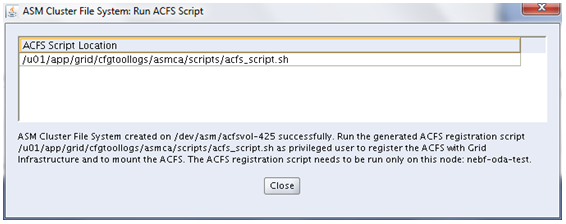
 <3> ODA X6-2M physical outlook, and mounted on server Rack:
 <4> After mounting the ODA on Rack, please following the instruction to plugin all the cables:
|
|__ o. Reference - ODA Deployment and User Guide - https://docs.oracle.com/cd/E75550_01/doc.121/e76900/GUID-027B1598-A5A6-4C7F-B1A9-6630F0FF10C2.htm#CMTIG298
<4> After mounting the ODA on Rack, please following the instruction to plugin all the cables:
|
|__ o. Reference - ODA Deployment and User Guide - https://docs.oracle.com/cd/E75550_01/doc.121/e76900/GUID-027B1598-A5A6-4C7F-B1A9-6630F0FF10C2.htm#CMTIG298
 <5> Oracle Data Appliance System [Logic level] Built-up Steps:
|
|__ 1) Initial Setup:
| >> majority of the config task is concerating on networking, such gateway IP, mask IP, statistic IP via ILOM.
| >> The initial network configuration is temporary. It is replaced during the final image deployment.
|
|__ 2) Final Appliance Image Deployment:
>> Config appliance image, including System information, Network information, User and Group information, Database information.
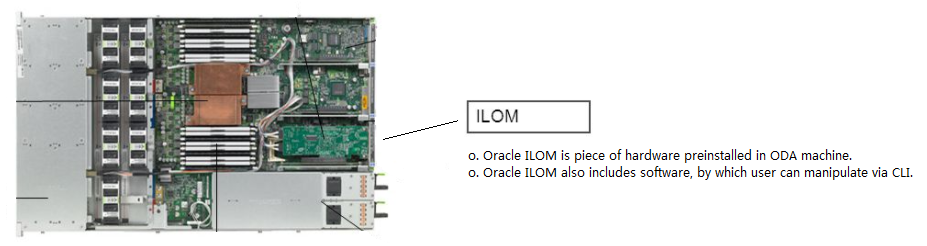
<6> Oracle Integrated Lights Out Manager [ILOM]:
|
|__ o. ILOM provides advanced service processor deciated hardware and software that you can use to manage and monitor your Oracle Sun servers.
<5> Oracle Data Appliance System [Logic level] Built-up Steps:
|
|__ 1) Initial Setup:
| >> majority of the config task is concerating on networking, such gateway IP, mask IP, statistic IP via ILOM.
| >> The initial network configuration is temporary. It is replaced during the final image deployment.
|
|__ 2) Final Appliance Image Deployment:
>> Config appliance image, including System information, Network information, User and Group information, Database information.
<6> Oracle Integrated Lights Out Manager [ILOM]:
|
|__ o. ILOM provides advanced service processor deciated hardware and software that you can use to manage and monitor your Oracle Sun servers.
 <7> How ODA connected to laptop via 2 adapters in our case for initial setup [Because VGA was not working]:
|
|__ o. Cable connection sequence for ILOM initial setup:
|
|__ 1) ILOM Serial Management Port "RJ45".
2) Convert to "Serial Female Port".
3) Convert to "Serial Male Port".
4) Convert to "USB Port".
5) Connecting to Laptop for screen command input.
<7> How ODA connected to laptop via 2 adapters in our case for initial setup [Because VGA was not working]:
|
|__ o. Cable connection sequence for ILOM initial setup:
|
|__ 1) ILOM Serial Management Port "RJ45".
2) Convert to "Serial Female Port".
3) Convert to "Serial Male Port".
4) Convert to "USB Port".
5) Connecting to Laptop for screen command input.
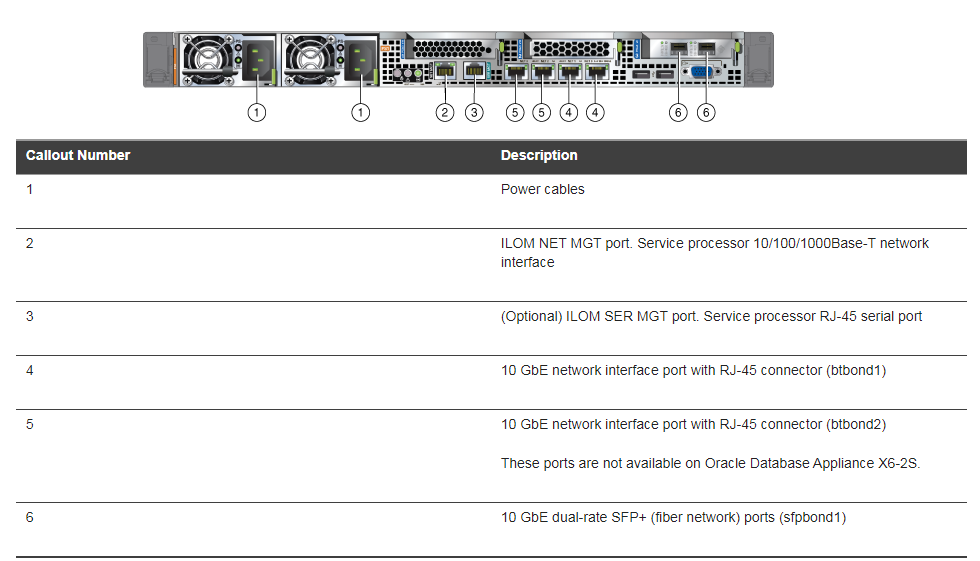
 <8> ODA "SER MGT RJ45 Port" and "NET MGT RJ45 Port":
|
|__ o. SER_MGT:
| |
| |__ 1) Known as "Serial Management", used for the initial configuration of the ILOM.
| 2) Only command line access is available via the port.
| 3) After physical connected, then open Putty terminal ===> Serial ==> "COM1", default port number is 9600 [default baud number is 115200].
|
|
|__ o. NET_MGT:
| |
| |__ 1) Known as "Network Management", used for connecting ILOM with Ethernet via switch[交换机].
|
|
|__ o. Both of "SER" and "NET" port is dedicated for ILOM hardware. According to Page 7 of this document, SER Port is labelled in Green, NET port is labelled in Black.
<9> The order of connecting "Serial MGT Port" to config SP first to enable "NET MGT Port" for Ethernet connection:
|
|__ o. The "ILOM service processor" network management port NOT operational until configuring network settings for the service processor. Configure service processor in this order:
|
|__ 1) After the service processor boots, access the ILOM CLI through the serial management port.
2) Configure the service processor to active "NET MGT RJ45 Port" available for Ethernet connection.
3) Commit the changes to the service processor parameters.
<10> After first-time powering on the machine, then cabling ILOM "Serial MGT RJ45 Port" to laptop USB to config networking settings for "NET MGT Port - Ethernet" connection:
|
|__ o. Reference: SUN Associated Machine User Guide
|
|__ o. Use Putty connecting through "Serial, COM1, 9600" to boot up the system with following output, and then enabling the Service Processor Network Management Port:
__________________________________________________________________________________________________________________________
| |
| U-Boot 1.1.1 (August 23 2007 - 21:30:12) |
| ... |
| POST cpu PASSED |
| POST ethernet PASSED |
| Hit any key to stop autoboot: 0 |
| ## Booting image at fe080000 ... |
| |
| IP Protocols: ICMP, UDP, TCP, IGMP |
| |
| Checking all file systems... |
| fsck 1.37 (21-Mar-2005) |
| Setting kernel variables ... |
| ... done. |
| Mounting local filesystems... |
| Cleaning /tmp /var/run /var/lock. |
| |
| Identifying DOC Device Type(G3/G4/H3) ... |
| OK |
| |
| Configuring network interfaces...Internet Systems Consortium DHCP |
| Client V3.0.1 |
| Copyright 2007 Internet Systems Consortium. |
| All rights reserved. |
| For info, please visit http://www.isc.org/products/DHCP |
| |
| eth0: config: auto-negotiation on, 100FDX, 100HDX, 10FDX, 10HDX. |
| Listening on LPF/eth0/00:12:4f:3f:8d:af |
| Sending on LPF/eth0/00:12:4f:3f:8d:af |
| Sending on Socket/fallback |
| DHCPDISCOVER on eth0 to 255.255.255.255 port 67 interval 6 |
| eth0: link up, 100 Mbps Full Duplex, auto-negotiation complete. |
| DHCPDISCOVER on eth0 to 255.255.255.255 port 67 interval 15 |
| Hostname: hostname. |
| Starting portmap daemon: portmap. |
| Initializing random number generator...done. |
| INIT: Entering runlevel: 3 |
| Starting system log daemon: syslogd and klogd. |
| Starting periodic command scheduler: cron. |
| Starting IPMI Stack...... Done. |
| Starting OpenBSD Secure Shell server: sshd. |
| Starting Servicetags listener: stlistener. |
| Starting FRU update program: frutool. |
| |
| hostname login: root |
| Password: changeme <--Default Factory Password |
| |
| Copyright 2007 Sun Microsystems, Inc. All rights reserved. |
| Use is subject to license terms. |
| ... |
| Federal Acquisitions: Commercial Software -- Government Users Subject to Standard License Terms and Conditions. |
| ... |
| |
| Warning: password is set to factory default. |
| |
| -> set /SP/network state=enabled |
| Set 'state' to 'enabled' |
| |
| -> set /SP/services/ssh state=enabled |
| Set 'state' to 'enabled' |
| |
| -> set /SP/network pendingipdiscovery=static |
| Set 'pendingipdiscovery' to 'static' |
| |
| -> set /SP/network pendingipaddress=172.13.32.5 |
| Set 'pendingipaddress' to '172.13.*.*' v |
| |
| -> set /SP/network pendingipgateway=172.13.7.6 |
| Set 'pendingipgateway' to '172.13.*.*' |
| |
| -> set /SP/network pendingipnetmask=255.255.255.0 |
| Set 'pendingipnetmask' to '255.255.255.0' |
| |
| -> show /SP/network |
| /SP/network |
| Targets: |
| Properties: |
| commitpending = (Cannot show property) |
| dhcp_server_ip = xx.x.xx.x |
| ipaddress = xx.x.xx.x |
| ipdiscovery = dhcp |
| ipgateway = xx.x.xx.x |
| ipnetmask = 255.255.252.0 |
| macaddress = 00:25:8F:3C:6C:AF |
| pendingipaddress = xx.x.xx.x |
| pendingipdiscovery = static |
| pendingipgateway = xx.x.xx.x |
| pendingipnetmask = 255.255.255.0 |
| state = enabled |
| |
| -> set /SP/network commitpending=true |
| Set 'commitpending' to 'true' |
|__________________________________________________________________________________________________________________________|
<11> After configuring "ILOM PS NET MGT PORT", you can SSH to the server via PuTTY now:
|
|
|__ o. When logon the server, checking mount point "df -h", only following file systems were initialized:
Filesystem Size Used Avail Use% Mounted on
/dev/mapper/VolGroupSys-LogVolRoot 30G 2.5G 26G 9% /
tmpfs 126G 631M 126G 1% /dev/shm
/dev/sda1 477M 46M 406M 11% /boot
/dev/mapper/VolGroupSys-LogVolU01 99G 45G 49G 48% /u01
/dev/mapper/VolGroupSys-LogVolOpt 59G 8.8G 48G 16% /opt
/dev/asm/commonstore-425 5.0G 49M 5.0G 1% /opt/oracle/dcs/commonstore <<<<<< Default ACFS
<12> Since server login successfully, next is downloading X6-2M Single Instance Bundle [SIB] Patch for image deployment:
|
|__ o. Searching on MOS with key words "ODA X6 SIB", following Doc ID will show up at the top of research result.
|
|__ o. My Oracle Support SIB downloading link ==> "Oracle Database Appliance X6-2S , X6-2M and X6-2 L (Doc ID 2144642.1)"
|
|__ o. Following 2 patches within the doc, are necessary for ODA X6-2M 12.1.0.2 appliance creation and image deployment:
|
|__ 1) Patch 23494985 - ORACLE DATABASE APPLIANCE X6-2 S , X6-2 M AND X6-2 L 12.1.0.2.170814 GI Clone.
| This file is required to initial deployment of the Oracle Database Appliance X6-2S/X6-2 M stack.
|
|__ 2) Patch 23494992 - ORACLE DATABASE APPLIANCE X6-2 S , X6-2 M AND X6-2 L 12.1.0.2.170814 RDBMS Clone.
| Oracle 12.1.0.2.170814 RDBMS Software Clone file for creating any new 12.1 database homes.
|
|__ a) GI SIB Patch has 2 zip files needed to be downloaded:
|
| > p23494985_1212120_Linux-x86-64_1of2.zip
| > p23494985_1212120_Linux-x86-64_2of2.zip
|
|__ b) After zipping both of them, 2 files will be unzipped with extension zippart:
|
| > oda-sm-12.1.2.12.0-170905-GI-12.1.0.2_1of2.zippart
| > oda-sm-12.1.2.12.0-170905-GI-12.1.0.2_2of2.zippart
|
|__ c) The 2 files needed to be merged together via following command:
> cat oda-sm-12.1.2.12.0-170905-GI-12.1.0.2_1of2.zippart oda-sm-12.1.2.12.0-170905-GI-12.1.0.2_2of2.zippart > oda-sm-12.1.2.12.0-170905-GI-12.1.0.2.zippart
<13> After zipping done, the ODA appliance repository needs to be updated as OS root. So, ODA will know what software should be insatlled:
|
|__ o. Following command is to update repository. NO space appended to comma.
| |
| |__ $ /opt/oracle/oak/bin/update-image --image-file /u01/software/GI/oda-sm-12.1.2.12.0-170905-GI-12.1.0.2.zip,/u01/software/RDBMS/oda-sm-12.1.2.12.0-170905-DB-12.1.0.2.zip
|
|
| Unpacking will take some time, Please wait...
| Unzipping /u01/software/GI/oda-sm-12.1.2.12.0-170905-GI-12.1.0.2.zip
| Unzipping /u01/software/RDBMS/oda-sm-12.1.2.12.0-170905-DB-12.1.0.2.zip
|
|
|
|__ o. When finished updating repository, a Oracle Bug was detected:
|
|__ >> The two 2 zip file will be extracted to location /opt/oracle/oak/pkgrepos/orapkgs/clones.
|
|__ >> File grid121.tar.gz is for GI software clone, db121.170814.tar.gz is for RDBMS clone. However, the correct name should be db121.170418.tar.gz.
|
|__ >> As a easy fix, you need to rename the wrong number to correct number, otherwise, ODA appliance Web Management Console can not detected to create database.
<14> As software repository updated, the appliance needs to be created known as image deployment:
|
|__ o. Login URL: https://192.168.3.44:7093/mgmt/index.html --> The IP is the one assigned during initial setup process, default factory credential: oda-admin/welcome1
<8> ODA "SER MGT RJ45 Port" and "NET MGT RJ45 Port":
|
|__ o. SER_MGT:
| |
| |__ 1) Known as "Serial Management", used for the initial configuration of the ILOM.
| 2) Only command line access is available via the port.
| 3) After physical connected, then open Putty terminal ===> Serial ==> "COM1", default port number is 9600 [default baud number is 115200].
|
|
|__ o. NET_MGT:
| |
| |__ 1) Known as "Network Management", used for connecting ILOM with Ethernet via switch[交换机].
|
|
|__ o. Both of "SER" and "NET" port is dedicated for ILOM hardware. According to Page 7 of this document, SER Port is labelled in Green, NET port is labelled in Black.
<9> The order of connecting "Serial MGT Port" to config SP first to enable "NET MGT Port" for Ethernet connection:
|
|__ o. The "ILOM service processor" network management port NOT operational until configuring network settings for the service processor. Configure service processor in this order:
|
|__ 1) After the service processor boots, access the ILOM CLI through the serial management port.
2) Configure the service processor to active "NET MGT RJ45 Port" available for Ethernet connection.
3) Commit the changes to the service processor parameters.
<10> After first-time powering on the machine, then cabling ILOM "Serial MGT RJ45 Port" to laptop USB to config networking settings for "NET MGT Port - Ethernet" connection:
|
|__ o. Reference: SUN Associated Machine User Guide
|
|__ o. Use Putty connecting through "Serial, COM1, 9600" to boot up the system with following output, and then enabling the Service Processor Network Management Port:
__________________________________________________________________________________________________________________________
| |
| U-Boot 1.1.1 (August 23 2007 - 21:30:12) |
| ... |
| POST cpu PASSED |
| POST ethernet PASSED |
| Hit any key to stop autoboot: 0 |
| ## Booting image at fe080000 ... |
| |
| IP Protocols: ICMP, UDP, TCP, IGMP |
| |
| Checking all file systems... |
| fsck 1.37 (21-Mar-2005) |
| Setting kernel variables ... |
| ... done. |
| Mounting local filesystems... |
| Cleaning /tmp /var/run /var/lock. |
| |
| Identifying DOC Device Type(G3/G4/H3) ... |
| OK |
| |
| Configuring network interfaces...Internet Systems Consortium DHCP |
| Client V3.0.1 |
| Copyright 2007 Internet Systems Consortium. |
| All rights reserved. |
| For info, please visit http://www.isc.org/products/DHCP |
| |
| eth0: config: auto-negotiation on, 100FDX, 100HDX, 10FDX, 10HDX. |
| Listening on LPF/eth0/00:12:4f:3f:8d:af |
| Sending on LPF/eth0/00:12:4f:3f:8d:af |
| Sending on Socket/fallback |
| DHCPDISCOVER on eth0 to 255.255.255.255 port 67 interval 6 |
| eth0: link up, 100 Mbps Full Duplex, auto-negotiation complete. |
| DHCPDISCOVER on eth0 to 255.255.255.255 port 67 interval 15 |
| Hostname: hostname. |
| Starting portmap daemon: portmap. |
| Initializing random number generator...done. |
| INIT: Entering runlevel: 3 |
| Starting system log daemon: syslogd and klogd. |
| Starting periodic command scheduler: cron. |
| Starting IPMI Stack...... Done. |
| Starting OpenBSD Secure Shell server: sshd. |
| Starting Servicetags listener: stlistener. |
| Starting FRU update program: frutool. |
| |
| hostname login: root |
| Password: changeme <--Default Factory Password |
| |
| Copyright 2007 Sun Microsystems, Inc. All rights reserved. |
| Use is subject to license terms. |
| ... |
| Federal Acquisitions: Commercial Software -- Government Users Subject to Standard License Terms and Conditions. |
| ... |
| |
| Warning: password is set to factory default. |
| |
| -> set /SP/network state=enabled |
| Set 'state' to 'enabled' |
| |
| -> set /SP/services/ssh state=enabled |
| Set 'state' to 'enabled' |
| |
| -> set /SP/network pendingipdiscovery=static |
| Set 'pendingipdiscovery' to 'static' |
| |
| -> set /SP/network pendingipaddress=172.13.32.5 |
| Set 'pendingipaddress' to '172.13.*.*' v |
| |
| -> set /SP/network pendingipgateway=172.13.7.6 |
| Set 'pendingipgateway' to '172.13.*.*' |
| |
| -> set /SP/network pendingipnetmask=255.255.255.0 |
| Set 'pendingipnetmask' to '255.255.255.0' |
| |
| -> show /SP/network |
| /SP/network |
| Targets: |
| Properties: |
| commitpending = (Cannot show property) |
| dhcp_server_ip = xx.x.xx.x |
| ipaddress = xx.x.xx.x |
| ipdiscovery = dhcp |
| ipgateway = xx.x.xx.x |
| ipnetmask = 255.255.252.0 |
| macaddress = 00:25:8F:3C:6C:AF |
| pendingipaddress = xx.x.xx.x |
| pendingipdiscovery = static |
| pendingipgateway = xx.x.xx.x |
| pendingipnetmask = 255.255.255.0 |
| state = enabled |
| |
| -> set /SP/network commitpending=true |
| Set 'commitpending' to 'true' |
|__________________________________________________________________________________________________________________________|
<11> After configuring "ILOM PS NET MGT PORT", you can SSH to the server via PuTTY now:
|
|
|__ o. When logon the server, checking mount point "df -h", only following file systems were initialized:
Filesystem Size Used Avail Use% Mounted on
/dev/mapper/VolGroupSys-LogVolRoot 30G 2.5G 26G 9% /
tmpfs 126G 631M 126G 1% /dev/shm
/dev/sda1 477M 46M 406M 11% /boot
/dev/mapper/VolGroupSys-LogVolU01 99G 45G 49G 48% /u01
/dev/mapper/VolGroupSys-LogVolOpt 59G 8.8G 48G 16% /opt
/dev/asm/commonstore-425 5.0G 49M 5.0G 1% /opt/oracle/dcs/commonstore <<<<<< Default ACFS
<12> Since server login successfully, next is downloading X6-2M Single Instance Bundle [SIB] Patch for image deployment:
|
|__ o. Searching on MOS with key words "ODA X6 SIB", following Doc ID will show up at the top of research result.
|
|__ o. My Oracle Support SIB downloading link ==> "Oracle Database Appliance X6-2S , X6-2M and X6-2 L (Doc ID 2144642.1)"
|
|__ o. Following 2 patches within the doc, are necessary for ODA X6-2M 12.1.0.2 appliance creation and image deployment:
|
|__ 1) Patch 23494985 - ORACLE DATABASE APPLIANCE X6-2 S , X6-2 M AND X6-2 L 12.1.0.2.170814 GI Clone.
| This file is required to initial deployment of the Oracle Database Appliance X6-2S/X6-2 M stack.
|
|__ 2) Patch 23494992 - ORACLE DATABASE APPLIANCE X6-2 S , X6-2 M AND X6-2 L 12.1.0.2.170814 RDBMS Clone.
| Oracle 12.1.0.2.170814 RDBMS Software Clone file for creating any new 12.1 database homes.
|
|__ a) GI SIB Patch has 2 zip files needed to be downloaded:
|
| > p23494985_1212120_Linux-x86-64_1of2.zip
| > p23494985_1212120_Linux-x86-64_2of2.zip
|
|__ b) After zipping both of them, 2 files will be unzipped with extension zippart:
|
| > oda-sm-12.1.2.12.0-170905-GI-12.1.0.2_1of2.zippart
| > oda-sm-12.1.2.12.0-170905-GI-12.1.0.2_2of2.zippart
|
|__ c) The 2 files needed to be merged together via following command:
> cat oda-sm-12.1.2.12.0-170905-GI-12.1.0.2_1of2.zippart oda-sm-12.1.2.12.0-170905-GI-12.1.0.2_2of2.zippart > oda-sm-12.1.2.12.0-170905-GI-12.1.0.2.zippart
<13> After zipping done, the ODA appliance repository needs to be updated as OS root. So, ODA will know what software should be insatlled:
|
|__ o. Following command is to update repository. NO space appended to comma.
| |
| |__ $ /opt/oracle/oak/bin/update-image --image-file /u01/software/GI/oda-sm-12.1.2.12.0-170905-GI-12.1.0.2.zip,/u01/software/RDBMS/oda-sm-12.1.2.12.0-170905-DB-12.1.0.2.zip
|
|
| Unpacking will take some time, Please wait...
| Unzipping /u01/software/GI/oda-sm-12.1.2.12.0-170905-GI-12.1.0.2.zip
| Unzipping /u01/software/RDBMS/oda-sm-12.1.2.12.0-170905-DB-12.1.0.2.zip
|
|
|
|__ o. When finished updating repository, a Oracle Bug was detected:
|
|__ >> The two 2 zip file will be extracted to location /opt/oracle/oak/pkgrepos/orapkgs/clones.
|
|__ >> File grid121.tar.gz is for GI software clone, db121.170814.tar.gz is for RDBMS clone. However, the correct name should be db121.170418.tar.gz.
|
|__ >> As a easy fix, you need to rename the wrong number to correct number, otherwise, ODA appliance Web Management Console can not detected to create database.
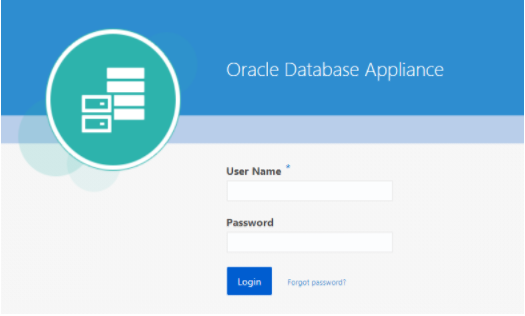
<14> As software repository updated, the appliance needs to be created known as image deployment:
|
|__ o. Login URL: https://192.168.3.44:7093/mgmt/index.html --> The IP is the one assigned during initial setup process, default factory credential: oda-admin/welcome1
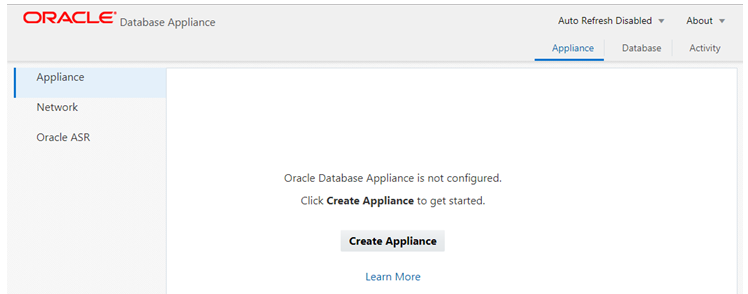
 <15> After logging in, click on "Create Appliance" to start image deployment:
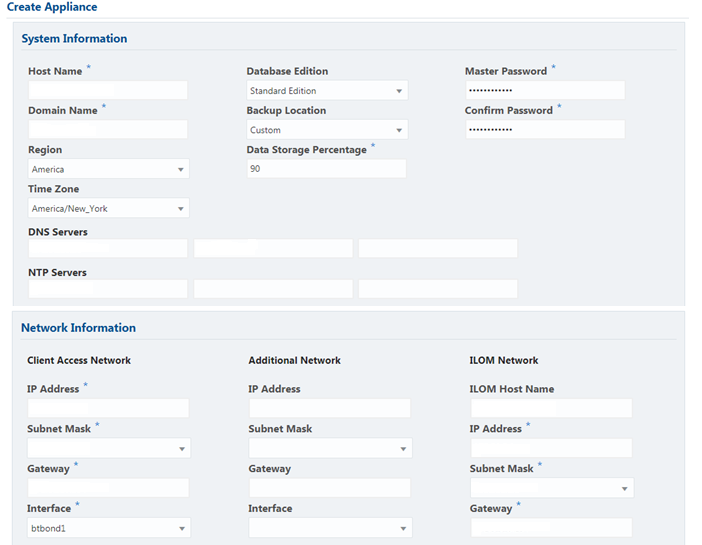
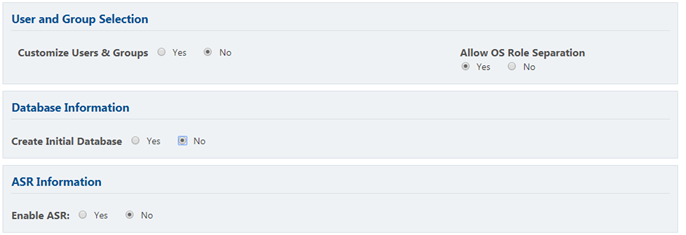
 <16> Fulfill the required information. IP addresses should got from company internal SYS Admin:
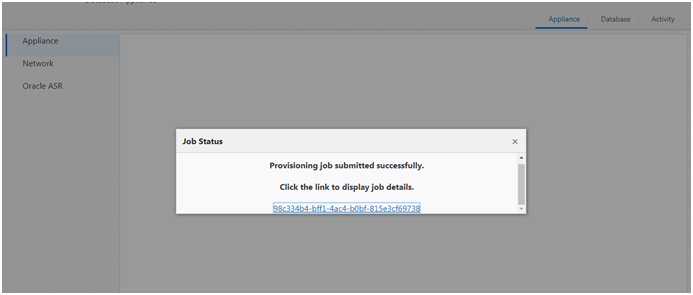
 <17> After submitting appliance provisioning job, click on the job number string to review the progress:
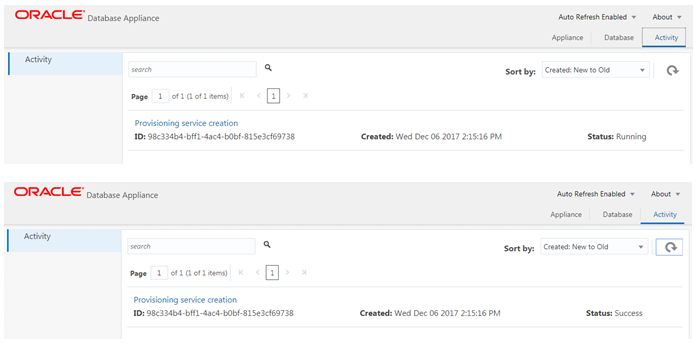
 <18> Click on the "ACTIVITY" tab to review the submitted job status:
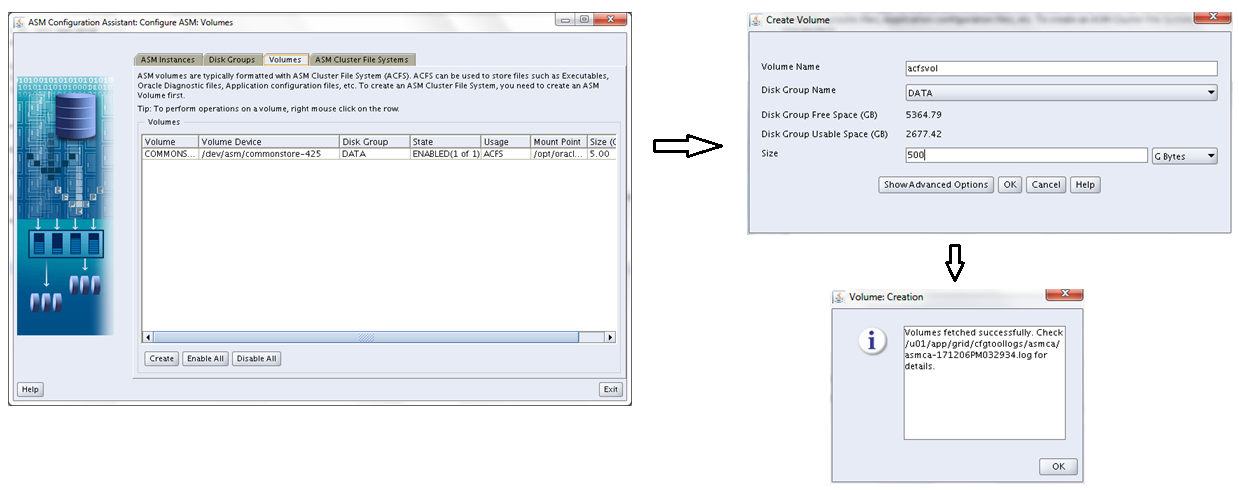
 <19> Create Oracle ACFS as OS user grid:
|
|__ $ . oraenv
|
| ORACLE_SID = [+ASM1] ?
| The Oracle base has been set to /u01/app/grid
|
|
|__ $ asmca --Start ACFS GUI, and in "Volumes" tab to click on "Create" button to create a volume:
<19> Create Oracle ACFS as OS user grid:
|
|__ $ . oraenv
|
| ORACLE_SID = [+ASM1] ?
| The Oracle base has been set to /u01/app/grid
|
|
|__ $ asmca --Start ACFS GUI, and in "Volumes" tab to click on "Create" button to create a volume:
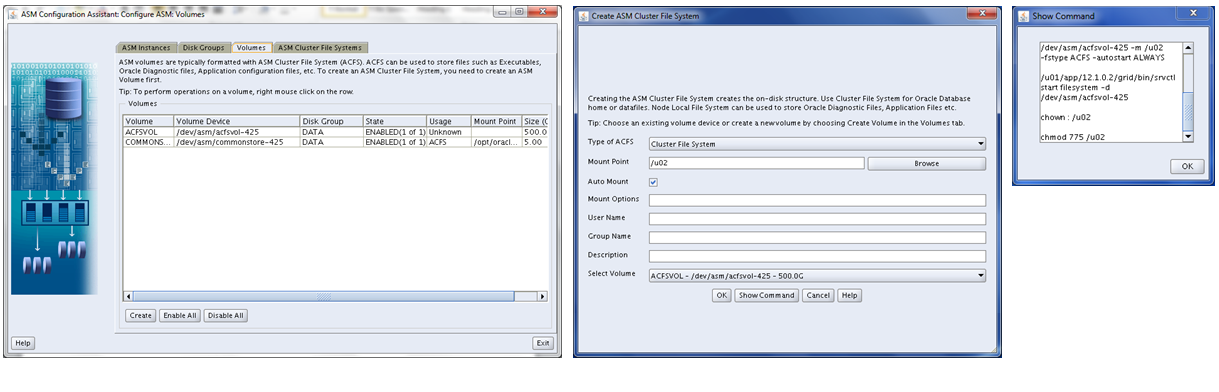
 <20> Mount ACFS on the newly created volume:
|
|__ o. After creating the volume, a new name can be found on the console. Click on tab "ASM Cluster File Systems", and choose "Create".
<20> Mount ACFS on the newly created volume:
|
|__ o. After creating the volume, a new name can be found on the console. Click on tab "ASM Cluster File Systems", and choose "Create".
 <21> Register the newly created ACFS with GI on the node as OS root user:
 <22> Remember to update file /etc/fstab accordingly:
|
|__ o. Mount point /u01 and /u02 are the new ones.
Filesystem Size Used Avail Use% Mounted on
/dev/mapper/VolGroupSys-LogVolRoot 30G 2.5G 26G 9% /
/tmpfs 126G 631M 126G 1% /dev/shm
/dev/sda1 477M 46M 406M 11% /boot
/dev/mapper/VolGroupSys-LogVolOpt 59G 13G 44G 23% /opt
/dev/mapper/VolGroupSys-LogVolU01 99G 45G 49G 48% /u01
/dev/asm/commonstore-425 5.0G 49M 5.0G 1% /opt/oracle/dcs/commonstore
/dev/asm/acfsvol-425 500G 1.1G 499G 1% /u02
/dev/asm/acfsvol2-425 1.0T 2.1G 1022G 1% /u03
<23> Check ASM internal disk group redundency and free/avail size:
|
|__ $ asmcmd
|
|__ ASMCMD> lsdg
State Type Rebal Sector Block AU Total_MB Free_MB Req_mir_free_MB Usable_file_MB Offline_disks Voting_files Name
MOUNTED NORMAL N 512 4096 4194304 5504488 2360748 0 1175276 0 Y DATA/
MOUNTED NORMAL N 512 4096 4194304 620704 599868 0 294820 0 N RECO/
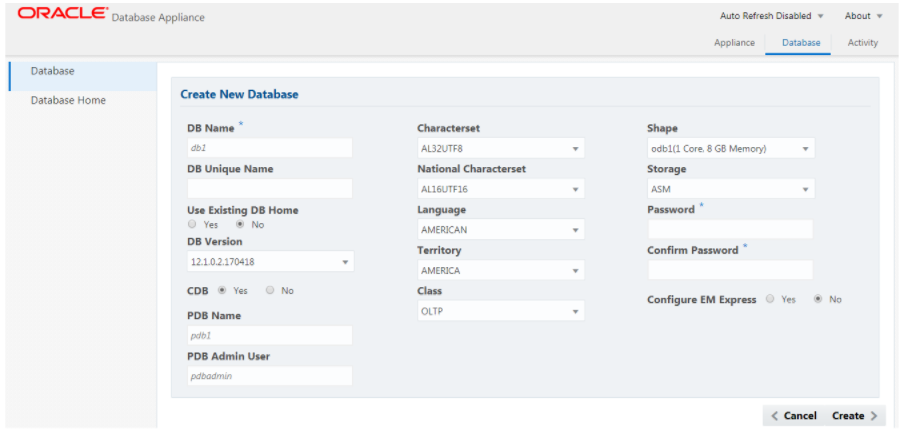
<24> Logon to ODA Management Web Console to create database. The port is 7093:
|
|__ o. URL - https://172.31.*.*:7093/mgmt/index.html [ Username: oda-admin, Factory Default Password: welcome1 ]
<22> Remember to update file /etc/fstab accordingly:
|
|__ o. Mount point /u01 and /u02 are the new ones.
Filesystem Size Used Avail Use% Mounted on
/dev/mapper/VolGroupSys-LogVolRoot 30G 2.5G 26G 9% /
/tmpfs 126G 631M 126G 1% /dev/shm
/dev/sda1 477M 46M 406M 11% /boot
/dev/mapper/VolGroupSys-LogVolOpt 59G 13G 44G 23% /opt
/dev/mapper/VolGroupSys-LogVolU01 99G 45G 49G 48% /u01
/dev/asm/commonstore-425 5.0G 49M 5.0G 1% /opt/oracle/dcs/commonstore
/dev/asm/acfsvol-425 500G 1.1G 499G 1% /u02
/dev/asm/acfsvol2-425 1.0T 2.1G 1022G 1% /u03
<23> Check ASM internal disk group redundency and free/avail size:
|
|__ $ asmcmd
|
|__ ASMCMD> lsdg
State Type Rebal Sector Block AU Total_MB Free_MB Req_mir_free_MB Usable_file_MB Offline_disks Voting_files Name
MOUNTED NORMAL N 512 4096 4194304 5504488 2360748 0 1175276 0 Y DATA/
MOUNTED NORMAL N 512 4096 4194304 620704 599868 0 294820 0 N RECO/
<24> Logon to ODA Management Web Console to create database. The port is 7093:
|
|__ o. URL - https://172.31.*.*:7093/mgmt/index.html [ Username: oda-admin, Factory Default Password: welcome1 ]
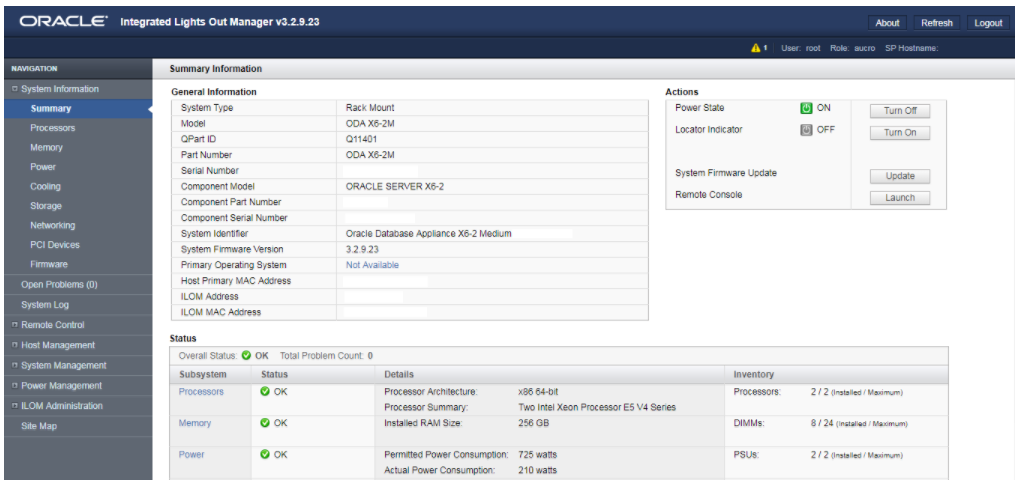
 <25> Logon to ILOM Management Web Console to review hardware states:
|
|__ o. URL - https://172.31.*.* [ Username: root, Factory Default Password: changeme ]
<25> Logon to ILOM Management Web Console to review hardware states:
|
|__ o. URL - https://172.31.*.* [ Username: root, Factory Default Password: changeme ]
Your Comments